
The positive taste and high nutrition content of microgreens have made them a popular favorite among health-conscious people and even at home cooks. It is not as hard as you may have thought that learning how to grow microgreens at home. All you need is a small tray, good seeds and a little sunshine or grow lights, and within 7-14 days you can be enjoying tender greens, which are fresh. The most popular kinds such as radish, sunflower and pea shoots are ideal to new growers and they are tasty to include in salads, smoothies and sandwiches.
To people who want to cultivate microgreens easily in their homes, it is important to observe simple microgreens care tips in order to have a healthy harvest. Keep the soil damp and free of waterlogged, have sufficient light and proper air circulation to ensure that there is no Mold. It may be easy to just use quality seeds and grow kits under established brands such as Greenu Microgreens that will ensure fresh and tasty greens. Practically, using little effort means that you can access homegrown, nutrient-dense microgreens all year round to make your meals healthier and bright.
What Are Microgreens?
Microgreens are small and immature vegetable greens that are cut soon after the first true leaves emerge. Microgreens do not just need light to grow, unlike sprouts which are just germinated seeds and thus require soil or other growing mediums to grow. They are available in numerous Flavors and colours, such as peppery radish and sweet pea shoots, nutty sunflower and fragrant basil, and miniature size. Having a bright look, strong flavour, and an impressive nutritional content, microgreens are already a favorite of health-conscious people and gourmet chefs. Their addition to your dishes does not only make the food taste good but also increases the vitamin and antioxidant content of the food.
Why Grow Microgreens at Home?
Planting microgreens at home is a simple and most fulfilling method to have access to fresh and nutrient-enriched greens on a daily basis. Getting as close to consumption as you can, you can be sure that microgreens are as fresh, delicious, and crunchy as possible, and this will add more freshness, flavour, and crunch to salads, sandwiches, smoothies, soups, and even main dishes. Homegrown microgreens are healthier and more delicious and pleasing to the eyes than store-purchased greens since the latter have preservatives, maintain bright colors, and add natural smell and texture to your meals.
Besides being a fresh tasting and delicious, microgreens are very high in nutrients. They are rich in vitamins, minerals, and antioxidants- in some cases, as much as 40 times more than the same vegetable fully grown- and are, in general a superfood to supplement the general health. Planting microgreens on the home front is also affordable, simple to look after and can be grown in tiny places and is environmentally healthy eliminating packaging and transportation wastage. The small but mighty greens can be sustained by anyone with little effort and due care and be consumed daily to add a healthy source of nutrients and flavor to our daily meals as well as create a sustainable lifestyle.
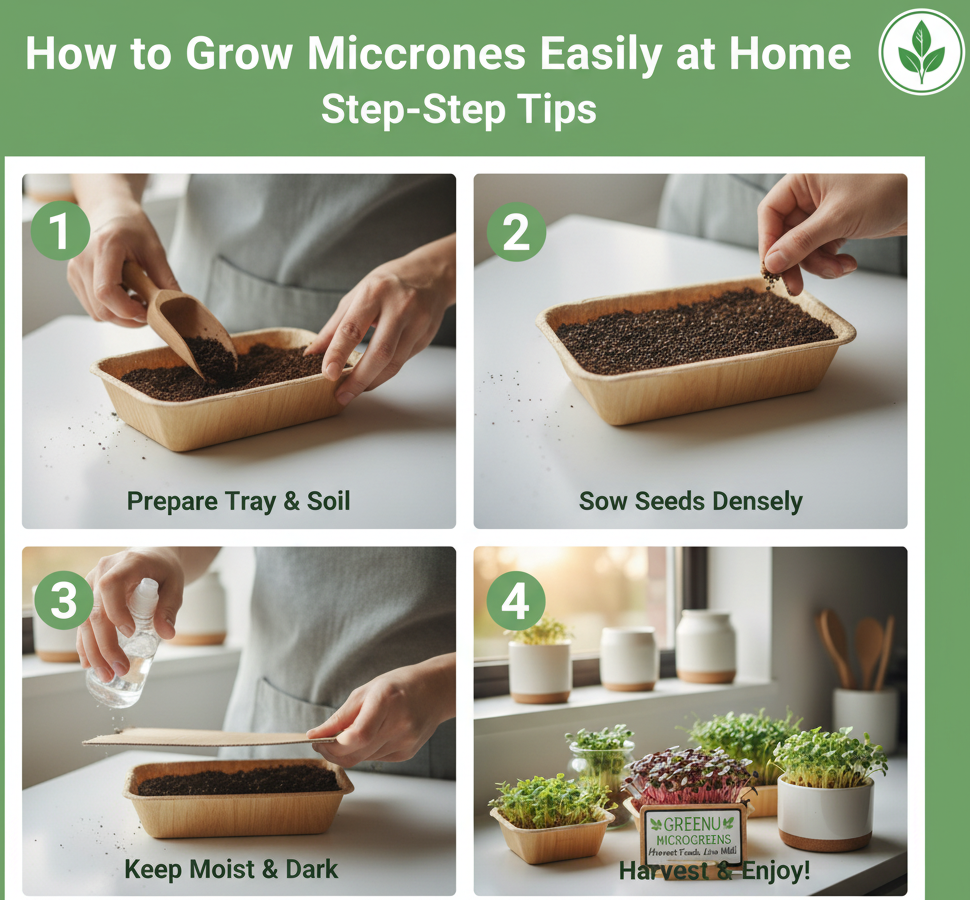
How to Grow Microgreens
Growing microgreens requires minimal effort and supplies. Here’s a step-by-step guide:
Step 1: Choose Your Seeds
Begin with quality and non-GMO seeds. Some of the commonly used beginner food choices are radish, sunflower, pea shoots, and basil. Greenu Microgreens sells a variety of fresh and healthy microgreens seeds that can be on indoor growing.
Step 2: Select a Growing Medium
Microgreens may be grown in soil, coco coir or hydroponic mats. A good media must be well draining to avoid moulds and allow healthy growth.
Step 3: Pack Your Containers.
Shallow trays or containers with holes. Pour your preferred growing medium in them and smooth the surface.
Step 4: Sow the Seeds
Cover the seeds with water. Densely planting is also possible since microgreens do not require a large space to grow. Squeeze the seeds into the soil so that they can be well contacted.
Step 5: Water and Cover
Use a spray bottle to irrigate the seeds very lightly in order to prevent their removal. Then cover the trays with a lid or a thin sheet of paper towel to provide the trays with a damp atmosphere, which facilitates germination.
Step 6: Provide Light
Once the seeds sprout, remove the cover and place the tray in a bright area with indirect sunlight or under grow lights. Microgreens typically require 12–16 hours of light per day for optimal growth.
Step 7: Maintain Moisture
Keep the growing medium consistently moist but not waterlogged. Mist your microgreens daily to ensure they stay hydrated and healthy.
Step 8: Harvest Your Microgreens
Microgreens are usually ready for harvest within 7–21 days, depending on the variety. Use clean scissors to cut just above the soil line. Harvesting early ensures tender, flavorful greens.

Easy Microgreens at Home
It does not have to be complex how to grow microgreens in the house. The following are some of the suggestions that can help to make the process easy and enjoyable:
- Get small: Start with one or two trays and add more as you get used to it.
- Select fast-growing varieties: Radish, mustard and sunflower microgreens are quick-growing varieties that are recommended to the novice.
- DIY grow kits: Greenu Microgreens sells home grow kits with trays, soil and seeds, which makes home growing microgreens a reality.
- Keep it simple: The process should not be overcomplicated, microgreens do not demand much care, water, and sunlight.
Microgreens Care Tips
Proper care is essential to ensure healthy microgreens. Here are some expert microgreens care tips:
- Avoid overwatering: Too much water can lead to mold and root rot. Use a spray bottle to maintain gentle moisture.
- Ensure proper airflow: Good ventilation helps prevent fungal growth and keeps microgreens strong.
- Provide adequate light: Insufficient light leads to leggy and weak greens. Place trays near a sunny window or use grow lights.
- Monitor temperature: Most microgreens thrive at 18–24°C. Avoid placing them in areas with extreme heat or cold.
- Use clean tools: Wash scissors, trays, and hands before harvesting to avoid contamination.
Creative Uses for Microgreens
Microgreens are versatile and can be incorporated into a variety of dishes:
- Salads: Add a colorful, nutrient-dense layer to any salad.
- Sandwiches & Wraps: Enhance flavour and texture with fresh microgreens.
- Smoothies: Blend microgreens with fruits and vegetables for a nutrient boost.
- Garnishing: Use microgreens to add an elegant touch to soups, pasta, and main courses.
Troubleshooting Common Microgreens Issues
Even with proper care, you may encounter minor challenges:
- Leggy growth: Usually caused by insufficient light. Move trays closer to a light source.
- Mold: Overwatering or poor airflow leads to mold. Remove affected greens and reduce moisture.
- Slow germination: Ensure seeds are fresh and soaking them for a few hours before sowing can speed up sprouting.
Why Choose Greenu Microgreens
Greenu Microgreens is a brand that is known to be reputable in order to make home growth of microgreens easy and enjoyable. Their quality seeds, convenience grow kits and professional service are useful to both beginners and more advanced growers. Greenu Microgreens has it all whether you are planning how to grow microgreens to consume them or carry out culinary experiment.
With the help of this guide, any person can grow microgreens that are fresh and healthy and that can be done at the comfort of his or her own home. Your microgreens will grow with less effort and attentions, and it will add flavour, colour, and nutritional value to all your meals.
FAQs About Growing Microgreens
- How long does it take to grow microgreens at home?
Microgreens can be harvested in 7-21 days (at most) depending on the type. Growing options such as radish and sunflower can be harvested after only a week, whereas those that grow slower need three weeks. - What is the best way to grow microgreens indoors?
Incorporate shallow trays that have a high-quality growing medium e.g. soil or coco coir. It is important to sprout the sow evenly, keep the medium humid and give indirect sunlight or grow lights to ensure the best growth of the seed. - How often should I water microgreens?
Microgreens should be maintained at a constant level of moisture but not soaked. Spray them a little one or twice a day depending on the humidity and temperature, so that they can grow healthy and to avoid Mold. - Can I grow microgreens year-round at home?
Yes! Microgreens may be cultivated in the year round with a very small space. With the help of high-quality seeds and grow kits of the reputable companies such as Greenu Microgreens, it is simple to have fresh nutrient-rich greens at all times.
Conclusion
Planting microgreens in the home garden is a very easy and most rewarding endeavour that provides an experience of having fresh, tasty, and nutrient-rich greens. With the instructions on how to grow microgreens, how to practice easy microgreens at home, and the necessary tips to maintain your microgreens, you will have an attractive and highly nutritious mini garden.
Even novices would be able to grow a year-long supply of year-round home-grown microgreens with high-quality seeds and the advice of reputable brands, such as Greenu Microgreens. These mini greens would be ideal in bringing in colour, taste and health to all meals, and at the same time, a sustainable and environmentally friendly life. Microgreens are one of the most effective and enjoyable options how to grow at home, regardless of whether you are a health enthusiast, a home cook or you just want to have a rewarding gardening experience.